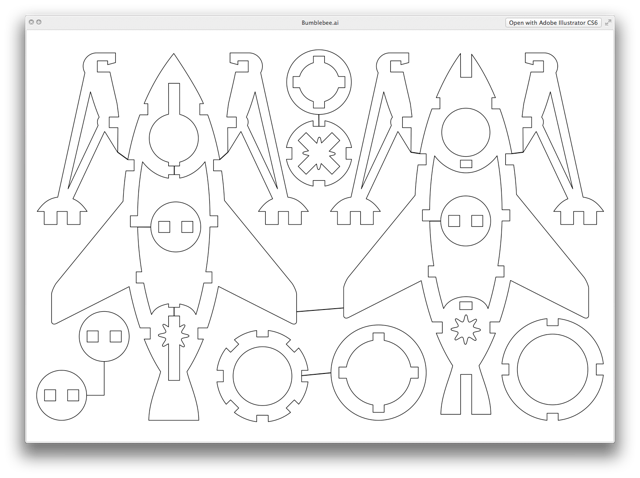
CNC files for Bumblebee – the miniature laser cut rocket

CNC Files for Bumblebee - the miniature laser cut rocket model
{adinserter Internal_left}I’m going to build the Groover’s Pocket Laser Engraver at some point in the future but so far not much luck with CD drives I’m disassembling (two so far). Both were very old drives (1996 and 1998) and (shocker!) things were much simpler back then
One did not even have a worm drive needed for the laser cutter project. The entire mechanism was based on a series of gears and clutches with one DC motor driving both the laser head and the CD tray (pictures below).

Samsung SCR3230E CD-ROM drive to be opened

Samsung SCR3230E Innards - nothing useful for the project
Another one had a worm drive but it was driven by what must have been the cutest servo drive on Earth – a tiny (the size of a cell phone vibrating motor) DC motor with one Hall sensor and even a homing switch but not a stepper drive needed for the project (below).

Toshiba XM-1402B laptop CD-ROM drive to be opened

Toshiba_XM-1402B innards - still not much useful for the project
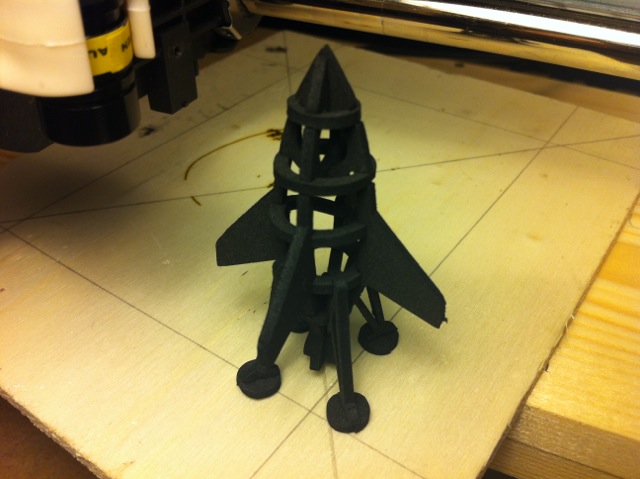
So, I ended up ordering some broken, for parts DVD-RW drives on eBay and while those are in transit, I’ve worked on another model that is small enough to be cut on the cutter whenever I eventually get all the parts together.
The name Bumblebee actually hints at the fact that I really wish I could cut some lighter colors (like yellow, for example). If the ribs are cut from alternating black and yellow foam, I think the rocket would look quite like a bumblebee. Alas, the proper coloring would have to wait until I have time to play with either blue or IR laser diodes in hopes that they would be able to transfer enough heat to light foam. The way it stands right now – the laser diode leaves no mark whatsoever on the yellow foam. I even blackened it with a Sharpie marker hoping that it would start the burn and then finish the entire depth but lo and behold, the laser burns just the black layer off (something like 0.1-0.2 mm – whatever got soaked by Sharpie) and nothing at all happens to yellow underneath.
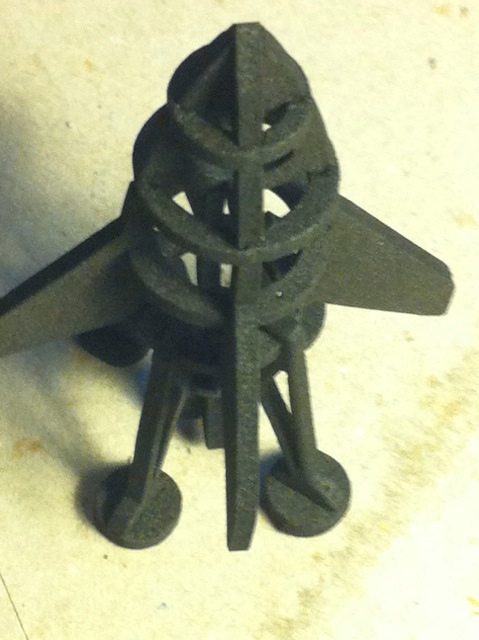
Another note about the rocket model: this is the first foam model where I had to use some glue – the landing gear is so tiny that I could not make slots deep enough to hold the parts well. They are too flimsy without the help of glue, so I really recommend using glue for the landing gear . All other parts come together OK without glue. If I have time in the future, I may revisit the design on the landing gear because I like my models not require glue.
Additionally, Bumblebee is the first model where one toothpick was not enough tools for assembly. I have used tweezers this time to position the formers (ribs) properly.
Start assembly with connecting the two halves of the body together (the stringers or longerons if it were an aircraft fuselage). Then position the two internal formers (ribs), the ones attaching from inside out. Then the bottom former (the one just above the exhaust), then the second from top and the topmost – last.
Here is a picture of Bumblebee with the earlier Retro model for scale comparison.

Bumblebee and Retro laser cut models. Scale comparison.
 CNC Files for Bumblebee – the miniature laser cut rocket
As always, if you cut your own model or make modifications, I’d love to see a picture of your project and post it here if you like. Please send your pictures to info AT elabz DOT com.
EDIT: Groover was kind enough to post a picture of Bumblebee cut on the actual intended laser cutter. I like his color scheme 🙂
")
Groover's Bumblebee rocker cut on the actual Groover's cutter 🙂
EDIT April 06, 2014:
Gonçalo sent me his pictures of a laser-cut Bumblebee. He also modified the top part of the landing gear to make is more sturdy. Please see his modified G-code file here and the pictures of his Bumblebee rocket below. Great job, Gonçalo!
Bublebee rocket made by Gonçalo
Bublebee rocket made by Gonçalo
Bublebee rocket made by Gonçalo
hello my friend, a question I just finished with engines cnc cd rom, but after three hours or (one day of work) is a motor and magnet are no longer working, you could resolve this detail, after 5 min work will become very hot, place live on each engine fan to cool and all, I am using a driver tb6560 and energy of the pc.
Thanks in advance.