Repairing Lights of America 7200LED-BN LED Lights
{adinserter Internal_left}Let me make it perfectly clear: if you see these sold in Walmart or elsewhere, stay away! This horrible product’s UPC is 755277720037 and the full part number is 7200LEDBN3VP. These are 120V-60Hz 2.5W (35mA) white LED “under cabinet” lights (“luminairs” as the manufacturer calls them) made in China and marketed by Lights of America, Inc. of Walnut, CA.
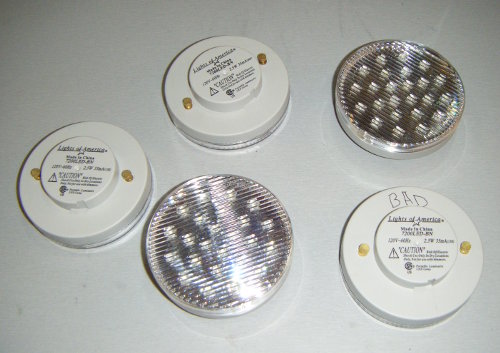
The manufacturer touts these as saving energy, linkable and longer lasting accent lights. I agree with the first two points but the “longer lasting” is a very relative term here. Let me put it this way: some (not all) did actually last longer than I was unpacking them but none lasted longer than 10 hours. And a couple were simply DOA (dead on arrival). Below is my collection of broken “Lights of America” LED lights. Only one has the “BAD” designation on it but you can be sure, all five pictured (out of seven total I have) are bad at the time the picture was taken.
I am not entirely convinced that a consumer should be messing with repairing these and, obviously, not everyone can or is equipped to deal with them. However, if you are the (un)lucky owner of a couple of these lights, you should know that they are relatively easy to fix. In my case I kept repairing these because the fixtures have been screwed to the bottom of the shelves above my workbench and if I remove them, there would be holes left. After all, this is my electronics workbench – that makes the repair a bit easier.
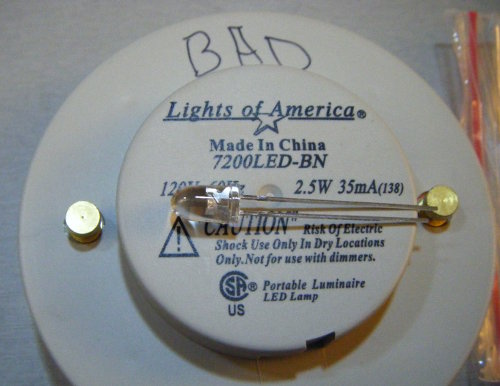
To start the repair you need a white LED. Any 5000 mcd or brighter 5mm LED would do, just try to get a shorter body ones, sometimes referred to as “straw hat”. Otherwise a file works well in getting a regular shape LED a bit shorter (below)
Here is the final shape of the LED you want:
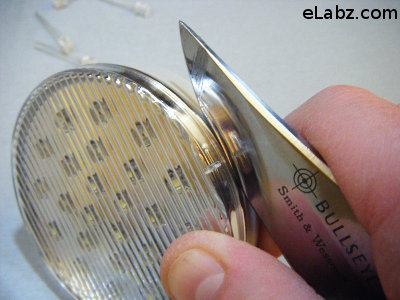
Now we are off to cracking the case open. Surprisingly (or not) , the quality of the plastic parts and even the glue that holds them together is very much on par with the LEDs they use.: You can wedge a knife very slightly into the crack between the two parts of the fixture’s case and turn the knife just a little. The glue will simply crumble away and the two halves will separate. See picture below:
Here is how the internals look like with the case open:
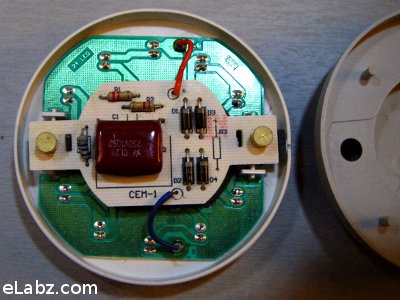
inside the case of Lights of America 7200LEDBN3VP
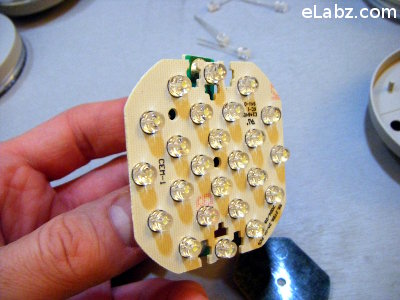
Here is a close-up of the front face with the 24 white LEDs. At least one of them is broken. Sometimes you can just tell which one by simply looking at the LEDs. In some instances you can see a dark dot inside on the crystal – evidence of burn-out.
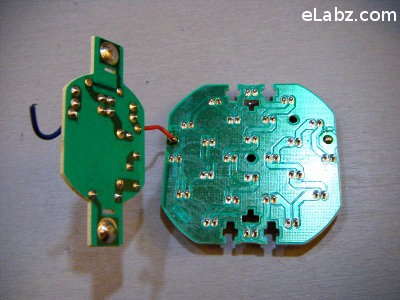
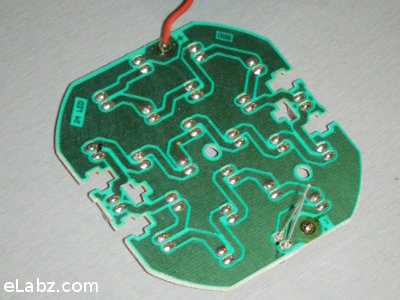
Inside the case there are two PCBs- the power source and the LED PCB. You’ll need to use your soldering iron to de-solder one of the leads and separate the two PCBs – you will need access to the pad side of the LED PCB. I did the blue wire but it really does not matter – whatever works best for you.
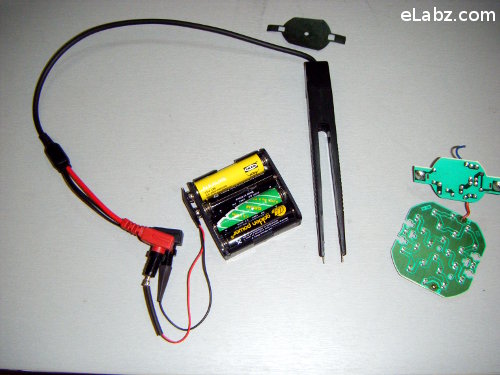
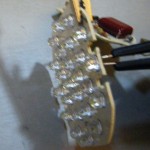
If you cannot simply see which LEDs is burned, it is time to probe them all. Basically, the idea is to apply 3.6 VDC across the leads of each LED to see which one does NOT light up. That would be the candidate for replacement. I’ve been using this little contraption (photo below) for testing – I had these tweezers probes that are pretty handy for the task. And there was a battery pack laying around that I could re-purpose.
Note that the battery pack on the picture does have a current limiting 420Ohm resistor (on the red wire under the heat shrink tube). Besides, I am using old and weak batteries in this pack. We are not looking for any particular brightness level here – just a bit of light coming out of the LED would mean that it’s OK.
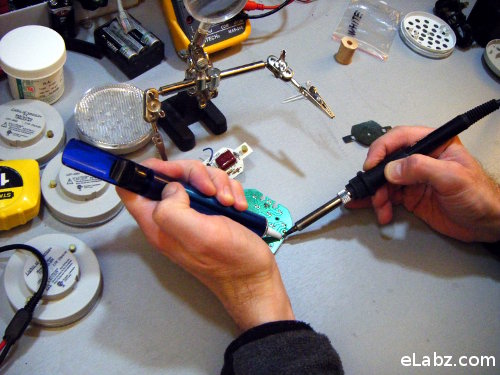
Once you’ve identified the bad LED, it’s time to de-solder it. A hand vacuum pump works best. Just be sure to clamp your work to something sturdy enough not to slide away while you are de-soldering.
After de-soldering the bad one a new LED goes in.
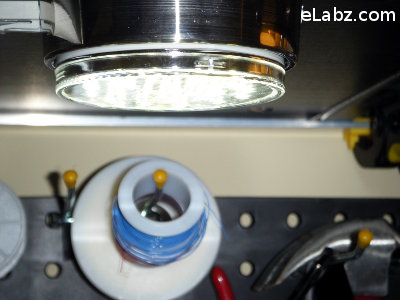
After putting all the parts back in reverse order, the Lights of America LED light shines again:
Edit: that particular light went out again after approximately 15 hours of use. I guess, these cannot be permanently fixed untill you eventually replace ALL 24 original LEDs. That sucks!
The end result: you spend about 15 minutes of your time to “buy” 15 hour of operation of the light. You be the judge if it’s really worth your time.
I have since supplemented the Lights of America fixtures with a vinyl-encased 12V LED strings. Apparently connecting the LEDs in parallel to 12VDC source as opposed to serially to 120VAC is better for LEDs because none of the stringed 12V LEDs has failed yet. My hopes are that this type will really live up to the advertised life expectancy values of 30,000 hours.
P.S. Here is yet another fine example of Lights of America products’ quality. The title says it all 🙁 CFL blew out, literally. I guess we should be grateful their LED bulbs at least aren’t explosive!




Looks like a load of rubbish.
If it were not for your expertse on micro electronics we would be out of action with this poorly desined LED. LOA usually very good about replacements and prompt. What do they say is the problem? Also where can you get more pucs to link to exsiting pucks? Thanks in Denver
Thanks for stopping by, Dave. I would be honest, it never even occurred to me to contact Lights of America because I understood them to be marketers and not manufacturers of the thing – just like most brands we see on the shelves in the stores. Besides, best they could ever offer is a replacement and it sounded like more of a hassle than a repair, at least to me, considering that they are mounted right above my electronics bench. But as far as additional pucks, I don’t see them in the store anymore. However, there are other lighting products like this Feit Electric Company’s UnderCabinet Fluorescent Light I bought in Lowes that has fixtures directly pin-compatible with the Lights of America ones and therefore can be used to extend a chain of installed LoA lights. They give off a much warmer light and they don’t turn immediately on – just like any other CFL – but you might even be able to alternate LoA LED lights with these CFL ones to make the entire chain’s light a bit softer on the eyes – the pucks are also completely interchangeable.
Good luck and a Happy New Year!
Completely agree with you, George! If you are talking about the product of course 🙂
Thank you so much for the pics, the troubleshooting tips, and the time you took to figure out and publish your notes. I installed a string of 7 lights under-counter for my sink and counter top at my cabin. I have been running them for about 18 months (actual on time has not been very much, since we don’t live there, and spend about 6-10 weeks per year). Yesterday my wife noticed a flash and three of the “pigs” went out. I had one spare and put it in, but had no idea what was going on. LED’s are supposed to last a long time. I searched fro replacements and found your posting. Not having all my electronic gadget stuff at the cabin, I was contemplating my predicament. An inspiration hit my brain, and I grabbed my volt-ohm meter, set it to measure 200 ohms, put the leads across an LED and it lit up. 2000 ohm setting and above would not light it up, but enough current would flow at the 200 ohm setting to let me check out the LED’s. Alas, I have no soldering up here, but I can fix two of the “pigs” when I get home. Since I have a spare (due to not having enough links from light to light), I will just use the spare to remove and replace diodes as they burn out. I really like the looks and the amount of light I get – 7 lights, 17″ above the counter, and about 15″ apart – yet alas for the quality. Thanks a bunch for the research eLABZ!
Thank you for stopping by!
This is a great tip! I have been checking red and green LEDs using a multimeter in the diode test mode for a long time but never had much luck with white and blue ones. My ohmmeter mode us auto-ranging, which is probably what prevents is from lighting up.
I think that if you are in a bind, you can actually just short one LED as a temporary measure. Just twist a piece of bare wire around the LED’s legs (although they usually sit pretty tight so may need to destroy the LED to be able to do that). It will make the rest burn brighter, so, considering they were not of a great quality to begin with, another one will probably fail shortly, too. So, this is more like a temporary measure.
I’ve also found a reference to another way of dealing with this predicament – return the LED lights to the store (the Costco story)
Thanks for stopping by and good luck!
sorry – typo on the previous subission for email.
Just replied to your comment and thought it may go to a wrong email, so please check it out at the site
I couldn’t find my de-soldering bulb, so I just soldered across the LED contacts. They are plenty close together, so a little blob works good. Worked great, and fast too – but as you said in your last comment that will increase the power through the rest of the lights and probably burn them out quicker. One of the brass locking/power tabs came off, and I didn’t notice it until later, so don’t know where it went. That makes one of my pucks a “spares” piece by default. Thanks again. Milt.
Hello I don’t have this type of Lights of America bulb but many of the other types which have too all failed. About 20 lights. I went in big thinking cheap and they’ll last for a long time. Which turned out to be like 6 months!!! I got to your site for dissecting. For me and for yours what of putting in something like:
“12V 24 SMD LED G4 Base White Camper Marine Light Bulb” I see them cheap on Ebay
http://cgi.ebay.com/12V-24-SMD-LED-G4-Base-White-Camper-Marine-Light-Bulb-/190460495778?pt=LH_DefaultDomain_0&hash=item2c585487a2
I have had luck and much better light with simlar SMD LEDs. Could such simply replace the default whole cluster of LEDs? Only solder the two wires? I’m going give it a try. Just trying to find an effective non destructive way of opening one of the LofAm bulbs.
thanks
@ SimonSays: Thank you for stopping by my site!
The major problem with LED lights is overheating. They can and do produce a lot of light output but they require some substantial air movement in the light fixture and none of the regular fixtures we are trying to use them in are designed to allow for effective (if any) cooling. If you look at (supposedly) more reliable and 4 times more expensive GE as well as Sylvania LED light bulbs, basically the entire body of the bulb is a heat sink for the LEDs. The body is made of aluminum – a great heat transfer material – and has ribs for better heat dissipation. That won’t happen in the Light of America light bulb. Even if you replace burnt LEDs, the overheating problem is not going away and the new ones will most likely fail eventually.
That said, it may be possible to limit the current going through the LEDs by using a higher value resistor in series with LEDs. That may render the light output too dim to the point of being useless but will do the trick of extending its life span.
I do have the regular-bulb-looking “Lights of America” product as well, all burnt indeed. The fact that they used glass for the reflector makes them a real pain to work with in terms of repair. I’m going to investigate how to best open them and post here. My guess would be that you have to carefully cut off the glass reflector but don’t quote me on that – there is a chance you can get to LEDs with the reflector still on.
You cannot use the 12V DC LED cluster (the eBay link in your comment) as a replacement of a 120V AC bulb, at least not without adding a current limiting circuit. I would stick with replacing individual LEDs – this thing is going into a 120V circuit and you don’t want it to cause a fire or electrocute someone.
Though perhaps not efficient on Lights of America bulbs but as with your eighth picture “separate two PCBs to have access to the back of the LED PCB” if the leads are clipped wouldn’t the Ebay 12V DC LED cluster work if soldered to the existing leads?
@SimonSays: I never actually checked the voltage between the leads connecting the two PCBs in the LofA fixture – it would be somewhat cumbersome to prep the light for live voltage measurements. Cumbersome but not impossible, so I might just do it for fun next time I open one of those. In fact, all my lights are gone for a few months now, I now have LED strings installed in addition to these L of A fixtures, so the need to fix those right away is much less. Still, I have reordered white LEDs last night and will be messing with the repairs again when they arrive.
As far as using the 12V clusters from eBay, I’d have to say that they are most likely not going to work as is: white LEDs require approx 3V forward voltage which makes me think the 24 LEDs in that cluster are actually organized in 6 parallel groups of 4 serially connected LEDs in each. Which means that if one LED burns out, only 1/6th of the cluster is disabled. This is not the case with the Lights of America clusters – the entire thing is dead if only one LED is burnt which means they are ALL connected in series and expect something like 72 to 76V between the red and blue leads.
Well, let me rephrase the last sentence – I think I remember that the light bulb-looking Lights of America LED bulbs were actually burning out 1/2 of the cluster at a time, not the whole thing at once like the pancake-looking ones but still, they are expecting a different voltage than the eBay cluster.
I was not even looking at the form factor – even if it looks somewhat similar in size, a minute difference in diameter would make it a pain to fit it into the bulb.
I think we are both stuck repairing these one LED at a time 🙁 …
I got one my Lights of America bulbs open without cracking/breaking the top. Once I get this cheap $2.50 LED cluster; I’m going to give it a try. Little to lose with this. I’m really addicted to some of these new SMD LEDs which put out a fairly strong warm white light. Lights of America almost turned me off LED as I presumed none of it was ready. While mostly a CFL house my SMD LED’s are growing.
@SimonSays: I know what you mean, I am also not giving up on LEDs per se, it’s just happens to be a more expensive solution than one might assume looking at the prices of Lights of America products.
I am also experimenting with LED light bulbs based on SMD (mostly 5050 form factor) clusters but not in my home – in my car. It does appear that SMD ones are able to transfer more heat onto the PCB and hence away from the silicon. However, I think they are still allowed to run too hot. In my case the 9-LED (5050 SMD) clusters that replaced the standard W5W 12V automotive bulbs in the rear side markers of my Prius only had something like 5 hours on them when 2 out of 9 LEDs went dark (in both lights). I’ve gotten a few more and have replaced them again – we’ll see what happens. It may be the way the side markers are designed in the 2nd gen Prius: you are sort of sliding the bulb into a cylindrical reflector that does not allow any air movement whatsoever.
Still, even in automotive applications it looks like for these LED bulbs to catch on they really have to be dependent for cooling on heat radiation and transfer through the material of the bulb/fixture only and not depend on any ventilation. It may also mean that the levels of brightness we’ve come to expect from a particular size incandescent bulb are simply not realistic for LED lights – they would have to be larger to allow for better cooling. It’s not always a show stopper but may hinder LED acceptance for your regular household lighting.
I may have enough material to make a post about automotive LEDs in the near future. Unfortunately, repair will be one of the hottest topics again.
Cheers!
Thanks again for stopping by my site!
Of automotive I’ve gone with SMD 8 (2) festoon for the dome light – better than original. Trunk some ?12 bar with adapter to the orignal festoon holder- much brighter. License plates 168’s (2) -just OK; a bit too cool blue/white. I think going to stay away from anything unless SMD. Also hitting up Target (wife) for Halloween closeout of Philips 50% off LEDs for Halloween lighting. Wife loves lights/decorations. She turns stuff on and I turn them OFF. Though once LEDs I won’t care within reasonable hours.
Of course ? 3 years from now the price will probably be even cheaper.
Very timely article. Bought two packages only yesterday, for under-cabinet and in-cabinet lighting. I don’t know why they say not to use them in display cases. Liability no doubt. They obviously work great. I unplugged them in under a minute — that’s the paranoid side of me. I know they overdrive those LEDs. My next test was to put two pucks in series across 120V. Light output was reduced of course. Still very useable for my display cases, considering I want to operate them 6-8 hours daily on a timer. Next, today actually, I chopped one of the supplied puck connecting cables in half, (actually only one of the two wires,) and soldered in a cord and plug. Taped it up. Works fine. I’ll stress test it for the next day. That’s a joke — running it at half power is a stress test. If all works as anticipated, I’ll modify the remaining jumpers and operate the pucks, two in series across 120V. Granted, I may have to buy a few extra to get the under the counter lighting effect that I’m looking for. Great article. Loved the pics. Simple schematic. 24 leds in series across a full wave bridge rectifier with a series voltage dropping resistor in series with a parallel capacitor resistor network on the supply side of the bridge. Thanks, now I don’t have to tear mine apart just yet.
@CharlySays:
Thank you for stopping by my site!
I would be very interested to hear the results of your “stress test” at half voltage. I’ll try something similar here as well – got two extra sockets for the pucks, just enough to build a test rig. My main concern is the amount of light they’ll produce at half the voltage. But, on the other hand, any amount is better than nothing – NONE of the four L of A pucks installed above my workbench are working at the moment.
Thanks again for stopping by!
Powered the two pucks in series for a nail-biting 12 hours. All is well. I couldn’t detect any warmth on the face of the units. Do they get warm when connected normally? I permanently installed those two in my kitchen island display cabinet. Another two are installed in series in two separate upper display cabinets on each side of the range.
For the over the countertop mounted pucks, the more elegant solution as a previous posting suggested is to increase the resistance of the current limiting series resistor. From your pic, (please confirm,) currently 100 ohms — brown, black, brown.
A neat way to do this… add a 1200 ohm 1/2 watt resistor and place it in the blank location named R3. Now turn the printed circuit board over and cut the trace shorting across R3 using an exacto knife. (Credit: sreksif, Florida) (Play with the resistance to get the desired light output.)
I’m heading home now… Looking forward sitting in a dark kitchen with all the lights out except for these pucks glowing softly. If they work trouble-free, time will tell… 30,000 hours? Hah!
Thanks again, Charly. I’ll respond quickly before checking out for tonight and then follow up tomorrow with some circuit experiments.
I just wanted to tell that I don’t really remember them being noticeably warmer than ambient air when working at full voltage. It could be because it’s been so long since even one of those lights has been functioning or it could be because the LEDs are encased in plastic that does not transfer heat all that well. In this design they become insulated twice: first the plastic body of the 5mm LED and then the plastic puck the PCB sits in.
Anyways, yes, the missing resistor seems the right component to play with, I’ll see what value gives an acceptable brightness tomorrow.
Measure the current through the red or blue wire going to the LED board and shoot for 20mA. Don’t forget to cut the trace on the backside of the board across R3. (Optionally, I was considering adding the resistor in the base.) For testing purposes, R3 is in the 120VAC line side, so jumper the puck terminals directly to 120V through your test resistance. I’ll try that tomorrow… it’s less invasive. If you could also measure the voltage to the LED board that may give us a clue why your repair LED blew so quickly. Good luck.
Quick update on the R3 hack (and I have some photos for later, too):
The puck normally runs at about 25mA and the voltage across red and blue wires is 65V.
Adding 1K for R3 drops the current to 22mA, 2K2 for R3 drops the current to 16mA, which is where I left it at. At approx. 40% less current the brightness of the puck is barely different from normal and the puck is running slightly cooler to touch than normal.
I have a normal and a hacked pucks running together, we’ll see which breaks first 🙂
[…] earlier post about repairing the Lights of America 7200LED-BN lights has generated quite a few comments and provided for a lively discussion but I end it at a rather […]
I did much the same test as you. The puck normally draws 23mA. My two pucks in series draw 4.75mA. Wow! No wonder they were cool. Similar results as you, 21mA@1K, 16mA@2K2. Additionally, 13mA@3K3 and 10mA@4K7. Considering I’m quite happy with my series connected display cabinet pucks drawing only 5mA. The 10mA hack will do quite nicely for under the counter. LED lighting manufacturers listen up! It’s not rocket science.
Like everyone else, I was burned by this product. But Lowes sells a fluorescent version of this light. The lights use the exact same base. I have them in my kitchen, and have not replaced one in 3 years. I used a couple of my spare fluorescent pucks to replace the defective LED ones. Here is a link to Lowes website with them listed.
Lowes’ link shortened by admin
Raymond
Thank you, Raymond.
I’ve looked at these CFLs before and was wondering if they would fit the socket but never actually bought one, and now I know! Would you say the light output is same/comparable to the LED version? Thanks again.
I would say the light output is roughly comparable, but the LED light is much more “blue” than the “soft white” of the fluorescent. With the difference in color, I guess it is hard to tell with any precision without some sort of meter. Personally, I was attracted to the supposed long life and energy savings attributed to LEDs. I know from firsthand experience that LED flashlights are comparative battery misers compared with incandescent. Truth be told, I like the color from the fluorescent better. I just found this forum while searching whether others had experienced problems with the LED puck lights from LOA. Obviously everyone who purchased them must have experienced premature bulb failure.
Raymond
Thanks guys!! this helped alot. Unfortunately, I installed these at our church thinking they would be great and last a long time (same story). They went out, went to the local Wal-mart to buy replacement and found they no long carry them— SURPRISE. Repaired the one I have with your help. At least for now they work!
Thanks again!
Rick
Worked great… Thanks! Saved me a headache to send back for replacement.
If any of you would like to get rid of their sockets (the base), the lights and the elctric cords I would be happy to take them. I know it sounds weird, but I have found a way to replace the lights using 12v instead of 120 by stripping all the electronics and keeping only the contacts. Since then I have no problem and less electricity also. Anyway if anyone would like to send them instead of throwing then away, send me an email and I will give you my address in Quebec Canada.
Normnand
Well, not me, at least not as yet. I’ve pretty much replaced all lights with their CFL conterparts but I’ve since found out that CFLs burn out, too 🙁 . So, I keep a couple of repaired LED ones as a standby backup. By the way, I’m not sure what current those contacts are rated for. They are, after all, high voltage ones, and you’re using about 10 times the current if you convert to 12V. So, be careful.
Thanks for stopping by!
I tried and it worked
thanks buddy and it’s a life saver
I have some of the upgraded 7200LED-BN bulbs that LOA sent me a year or so after I installed 2 4-puck strings in my kitchen in March of 2009. The replacement bulbs were installed in Nov 2009 and are still going strong as I write this. That’s over 6 years! We use them a lot. At least 3 or 4 hours a day in summer. More in winter. The 3 original 7200LED-BN replacment bulbs were sealed. They replaced 7200-BN bulbs. The only difference I saw between them (I did not open them) was the new ones were 2 watt bulbs and the originals were 2 watts.
After more bulbs failed, I called LOA again and they sent me 8 upgraded 7200LED-BN bulbs which have vents in them surrounding their “plugs”. The last bulb I changed was in 2014. I really like these! I wish they still sold them, as I’d like a 4 foot extension wire and another puck to install one on the opposite side of my stove!!
One correction. The original 7200-BN bulbs were 2.5 watts. I also have 3 of the vented replacements left for when any of these go bad.
I almost forgot about your article and realized that I was on my “Last” Puck that I had leftover…from my install in Jan. 2011..lol.. I actually ordered replacement LED’s when I first read your article..Lucky for me.. I remembered where I stashed them.. Now all four are working again.. and I have 5 spares… Thanks Again.. for the Hack and the repair…