Hacking Lights of America 7200LED-BN LED Lights
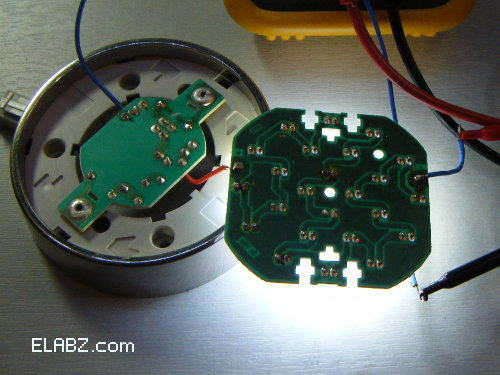
Lights of America 7200LED-BN LED Lights being hacked
{adinserter Internal_left}The earlier post about repairing the Lights of America 7200LED-BN lights has generated quite a few comments and provided for a lively discussion but I end it at a rather pessimistic note: ” you can repair it now but eventually the light will fail again”. That’s because this has been my experience with all lights I’ve repaired so far. They have 24 original LEDs and after just a few hours of use another LED inevitable burns out.
Encouraged by one of my visitors, CharlySays , I decided to investigate the issue further and see if anything can be done to increase the useful life of these lights. Besides, the lights have been dark for almost half a year now and I was ready to remove them from under the cabinet and possibly replace with mini CFL lights of a similar form factor.
Keep reading for the results of the hacking exercise:
Basically, there are several design characteristics that, combined together, lead to horribly bad reliability of the light fixture despite the fact that each individual LED is capable of burning in excess of 30,000 hours. I’m hesitant to call them design flaws because a differently designed light would most certainly cost several times what L of A 7200 costs.
One of the basic problems is that all 24 LEDs are connected in series and therefore each burnt LED breaks the circuit and the entire fixture goes dark.
Another problem I see is that the LEDs are very nicely insulated by the plastic body of the fixture so they just cook themselves while on.
Lastly, the problem that we can actually do something about is that the LEDs are allowed to run in a current that exceeds that of the standard white LED spec. I don’t really have a spec for the particular LED used by Lights of America but most one-crystal white LEDs (you might call them “older type” because currently popular SMD-type LEDs usually have 3 LEDs connected in parallel, so they need three times the current) are spec’ed at 20mA whereas Lights of America 7200LED-BN runs at above 26mA (see pic below)
The voltage between the ends of the LED cluster coming from the rectifier diodes and the RC circuit on the other PCB is approximately 65V (see pic below)
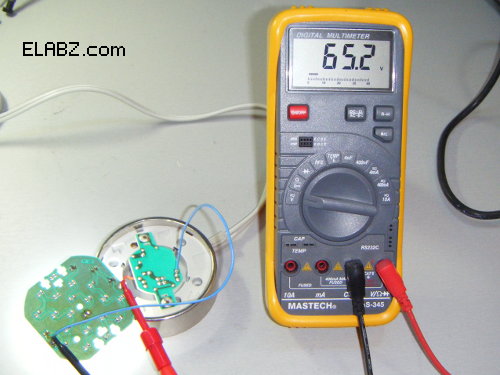
Lights of America 7200LED-BN LED - original voltage across LED cluster
The voltage drop PCB has an empty position for a current limiting resistor marked as R3. I am assuming the designers wanted to be able to limit the current through the LED cluster but then did not like the brightness at the lower level. My wild guess would be that they used good LEDs in their prototypes yet for production “standard” LEDs were purchased and that killed reliability.
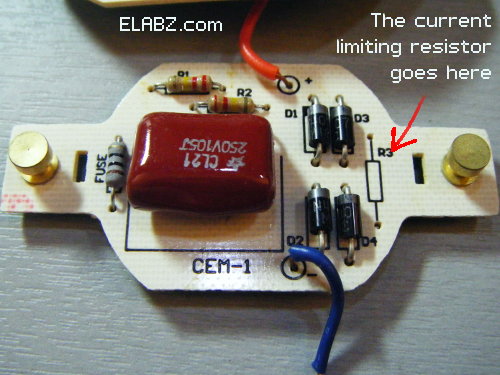
Lights of America 7200LED-BN LED Lights R3 position
The modest hack I’m doing here is to install the resistor and bring the current through the LEDs to within the spec limits yet to the point that the LEDs are not too dim to be useful as a light fixture.
We need to use a sharp knife to cut the PCB trace on the copper side of the PCB that originally shortens the R3
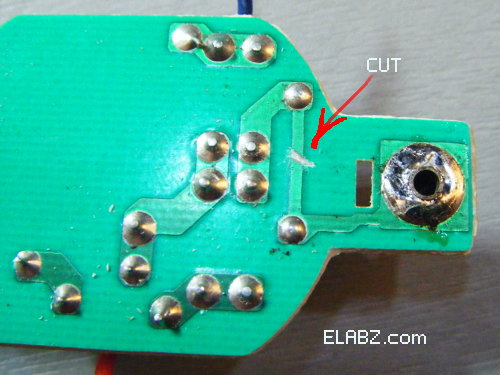
Lights of America 7200LED-BN LED Lights- cut this trace
I’ve tried a couple of R3 values and it appears that using a 1KOhm resistor brings the current down to 22mA – better but not quite the spec and 2K2 (2.2KOhm) resistor (pictured below) gives 16mA – 36% less than in the original light and within the spec.
Update: CharlySays was kind enough to provide couple more current readings for R3 values: 13mA@3K3 and 10mA@4K7
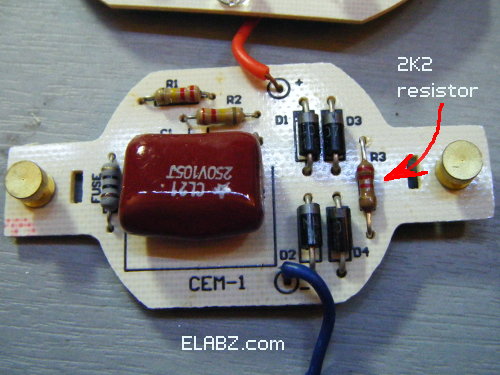
Lights of America 7200LED-BN LED Lights - new 2K2 resistor installed in R3
Here is the current reading I was getting with 2K2 R3 installed:
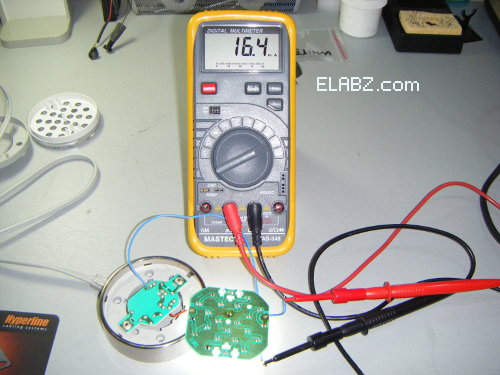
Modified Lights of America 7200LED-BN LED Lights current reading
I have also repaired two of the lights in a regular way (just replacing the burnt LED) and installed the hacked one and the regular one side by side, pictured below. It is notoriously difficult to photograph a light fixture properly when it’s on, so you’ll have to trust my judgment that the light output of the 16mA version is only very slightly less than that of 26mA one (almost imperceptible) and it runs cooler enough to feel the difference by hand.
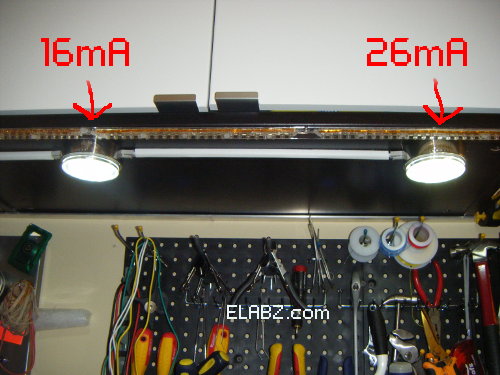
Modified Lights of America 7200LED-BN LED Light (left) and an original one
Conclusion? It’s probably too early for one. One of the repaired original LEDs is already dead again. Another original is working along the hacked one just fine so far but I totally expect it to fail soon. It’s been something like 16 hours and the original one is hotter than the hacked one, so as soon as it fails, I’ll post an update here.


I like it. Very nice. Your voltage board pic tells a disturbing story. That 10 ohm resistor in the FUSE position is supposed to limit the inrush current to the capacitor. (Capacitive reactance takes over from that point.) It’s too small. If you happen to apply power to the puck when the voltage is at the peak of the sine-wave, there’s little to no delay, the capacitor charges immediately and the current surges. This current spike is what takes out the LEDs. When you add the resistance at R3, it is also effectively connected in series with the capacitor and limits the inrush current to the capacitor. Most puck failures probably happen at power-on.
I actually noticed that inrush when I powered on my two pucks that are connected in series a couple of times. One unit momentarily flashed and then both units normalize to a steady on state. i.e. Having a resistance in series is a good thing. Only one thing I can see wrong with your pics… Your workbench is too neat. Enjoy.
Heh, thanks, CharlySays. The neat workbench is a result of my cleaning efforts yesterday. The clean spot seen on the pictures has been formed by removing the CNC router (this one: http://elabz.com/laser-cutting-diy/ ) – just enough space to put the open LED puck, multimeter and leads. Rest assured, the rest is as cluttered as everybody else’s.
From your analysis I am hearing that long run tests are not as useful as on-off test. I’ll try set something up for that. Thanks again!
Micro switch on a cam. That would be shear torture and very revealing. Looking forward to the results of that one.
I have 6 similar dimmable LED undercabinet lights from Home Depot. One puck failed completely after a year. I opened the failed puck (no glue), adjusted the insulation between the lamp holder and the control circuitry, reassembled it, and reinstalled it. It works now. Go figure!
This is a different, but related model, so your mileage may vary. We’ll see how long it keeps working.
@Eric: Thanks for stopping by! I actually had one of these pucks with the prongs (the ones connecting them to the light fixture) not properly soldered in. You know, the prongs are *inside* a puddle of solder but not actually connected because the solder did not stick to them – dirty prongs, low soldering iron temperature, no flux (or, I can imagine, all of the above). You could just turn the prongs inside the “mount” created by the solder once solidified by fingers. So, the puck would start working, then get hot and stop. You’d touch it – it’ll go for awhile longer, then stop again. Drove me nuts until I opened is and re-soldered properly.
On a side note: the “control” puck without the 2K2 resistor died today, coincidentally with Eric’s comment. It held for approx. 20 hours after the last fix. Also, a couple of weeks ago I have finally received a proper replacement LEDs from an eBay seller in China – I ran out of regular body white 5mm LEDs anyway and ordered shorter ones so no fiddling with a file to make them fit into the puck anymore. So, I decided to celebrate (besides, we are snowed in here in SE PA) and finish hacking all the remaining pucks. So, if any of them fail again, I think my next step would be to just throw it away.
Thanks for posting this info. It made fixing mine so much easier and I added the 2.2K at the R3 while I was at it.
Thanks again
Dan
I was surprised when my LED lights failed only several months after installation. But thanks to you, I was able to easily make the fix. Adding the 2.2K resistor at R3 made little, if any, difference in the illumination.
Larry
Let failed, Found open and shorted LED. Replaced both, added 2.2k ohm current limiters to each of 3 pucks, all functional now. Thanks for your info.
Wife said that 2 of the 3 pucks are not operating now, 3 Nov 2012… Here we go again.
Emil, I know what you mean. By now I gave up, too, and just bought CFL pucks as replacements (fit into the same socket, so no change in hardware was necessary)
This is fine for electrial engineers and hobiests. I dont, and will not, take the time to do a work around. What I would like areabout 12 new ones that will work for 30k hours or less.
Has anyone tried to reduce heat by drilling the face in several places? Dick
I don’t believe heat is an issue so much as the uncontrolled voltage spikes at the moment of turning it on or off.
Pretty much every LED light that went bad (and by now it is again all of them, even those I fixed at one time or another) was working fine before I switched it off. Then it would simply not turn on the next time. It’s just a function of bad power supply design, using bad components to implement that design and even skipping some of the components to save a couple of cents on cost. LoA is so bad because it appears to exhibit all of these corner cutting techniques in the same product 🙁
Thanks for stopping by!
Do know of an alternative lighting setup that you would recommend? (thanks to all for detailed info)
I ended up leaving the fixtures in place but replacing the LED pucks with their CFL analogs. Home Depot (and Lowes, I believe) sells a Hampton Bay “GX53 7-Watt Fluorescent Bulb” SKU 914152 that is an exact CFL replacement of the LED puck.
I recessed these pucks under my cabinets and have been dealing with this issue for over a year (since I’m stuck with them). The voltage fluctuations that exceed 120v are definitely the main issue and especially on start up. I have had one working for over a year without issue and have recently found cheap and reliable replacement capacitors and LEDs on a popular auction site. Here is my solution:
1. Use a multimeter w/diode check. Use the diode check function to identify open and damaged (glow very dimly) LEDs.
2. Replace the 1uF Capacitor w/.33uF 400v Polypropylene metal film. This will reduce the voltage and therefore the intensity.However, it’s not all that noticeable. You might try a value in between for a brighter light but I know that this value will last.I bought a lot of 10 caps for about $3.
3.Replace 1 of the 220k 1/4 watt carbon resistors with a 1/2 watt (for total of 3/4w)
4.I bought 100 quality LEDs for under $4. This will compensate for the brightness if it bothers you but they too will burn out if you don’t make the other changes.
It’s a lot of work, but if you happen to be stuck with them like I am. It will work. It’s very interesting to see what other solutions people have come up with! Thanks!
Thank you for your suggestions, Daniel. I’m sure someone will be able to try them out – there seem to be scores of people that bought these. Even now, two years after the fact (and after Walmart stopped selling them). By the way can you still buy them, when did you buy yours?
Anyway, I’m not sure I understand the reason for your point #3 – the two resistors aren’t in parallel, so “beefing up” one of them would not do anything for the current capacity of the other. I agree with the rest.
By the way, you’re not stuck with the pucks – you’re stuck with their receptacles. There are CFL light pucks out there that produce more light (and more heat, so be careful) and warmer color than the LED ones, and are a direct replacement of the LED pucks. See my previous comment with the part numbers.
Thanks for stopping by!
I bought mine about a year and a half ago online. That’s great news that there are replacements that fit the socket.
You are absolutely right about the resistors. They are in series. I don’t remember why I began replacing the resistor and I haven’t put much thought into it. I tried several designs before finding something that held. Step 3 shouldn’t matter.