Tiny DIY CNC Laser Cutting using old DVDs: don’t repeat my mistakes
The idea to document a failed project is not mine. When I read this post by Hackaday, I realized that I do have a project that failed which I don’t want to simply trash. Some valuable insights have been gleaned while working on it and I am planning to reuse many of the parts and the software in a different project. I have so many DVD drive parts now that it would be silly not to make another attempt at building a DVD CNC laser cutter, but it will definitely be designed differently, thanks to the lessons learned. So, that’s how this post came about.
The DVD CNC project was conceived as an “enhancement” of an earlier project I’ve been mulling over in my head for the best part of the last 10 years (yes, my projects are THAT slow to materialize). The project was tremendously helped by this Instructables which made me reconsider my previous idea of using more robust but very difficult to acquire anymore 5.25″ floppy drives and use parts of DVD-RW drives instead.
I have made several airspace models designed to be cut on the tiny 1.5″x1.5″ cutter made of DVD parts, and the challenge of fitting everything into the tiny 1:212 scale was fun, but in reality the limitations of the 1.5″x1.5″ working envelope were just too apparent. Especially so for airspace models where I could really use longer parts for the wings and the fuselage.
So I decided to stack two linear stages with 1.5″ travel each to create a whopping 3″ x 1.5″ working envelope. Something I’ve tried to illustrate in this video:
So far so good, right? By the way, I’ve already posted the conceptual stuff about this project in this earlier post.
{adinserter Internal_left} I also added another feature: I wanted the piece of material being cut to be immobile so I can position a large sheet of foam and only cut 1.5″ square piece of it. Also, I had my sights on a possibility to burn some designs on larger wooden plaques which was also easier to do if you eliminate moving the material around. I was also thinking about eventually turning this into a 3D printer (and at some of the videos you’ll see it sporting a third stage, unused) and since a vat with UV-cured resin was to be involved, I wanted the effector head of the machine (in this case – the laser diode) to move around the material.
In retrospect, it turned out to be much easier to just cut small 2″ x 2″ squares from foam and pin them down to the base with small magnets than it was to handle large 8″ x 11″ sheets of craft foam, so now I know that I can skip this requirement and won’t lose much. I also was never able to burn wood, except for balsa, so the large(ish) plaques won’t be mounted there either.

DVD CNC Laser Cutter – X (below) and Y (atop) axis
I actually think that combining stacking of the linear stages with immobile material requirements has created the conditions that led to the failure of the project. If your material is static, you have to move all of the hardware that comprise both axis around. That creates a lot of extra load on the linear stage that lies at the very bottom of that stack. In addition to the load, the moving part of the machine becomes larger in size and no longer rigid, which kills the accuracy, already not so great with DVD’s 20SPR stepper motors.
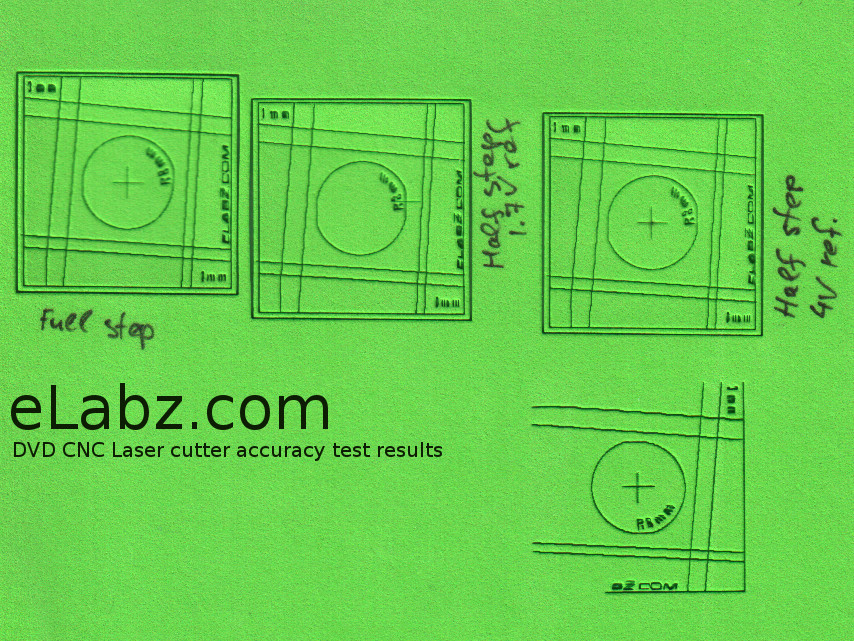
Laser cutter test results
So, the bottom line was that the accuracy of cuts just wasn’t there. I was never able to achieve anything close to the theoretically possible 0.125mm accuracy in cuts, especially along the overloaded X axis. Take a look at the picture of the test cuts to the left (be sure to see the picture at full size). Note how the slanted straight lines are not actually straight and are rather sawtooth shape. The vertical lines were designed to have the top be exactly 3mm to the right from the bottom, which for the 3mm pitch lead screw of a desktop DVD stepper motor means one revolution of the rotor. In other words, one such line represents the full 38mm travel of the Y axis and one revolution (3mm travel) of the X axis motor. Horizontal lines are shifted 2mm because the Y axis in my cutter is using a laptop DVD stepper, which normally has 2mm lead screw pitch.
You can literally count the exact number of steps the motor moves, and it just happens to be 16 for the smaller 16 SPR laptop DVD stepper of the Y axis and 20 for the slightly larger 20 SPR desktop DVD stepper. I have been experimenting for hours with various microstepping settings as well as voltage references of the EasyDriver bipolar stepper driver boards (which you see on the picture) and later with directly driving these steppers from H-bridges in half- and full step mode. But I could never quite get rid of the sawtooth cut profile and that was the deal breaker. Combining the tiny size of the model with inaccuracy just does not work. I did cut a couple of models on this cutter (all the originals were cut on a professionally made CNC router despite their small size) and none of the models could be put together – that’s how inaccurate the cuts were.
So, as I look back at this project, I see it failed at no less than three different levels:
1. Research: I did not do enough initial research on the accuracy of the steppers. Knowing how difficult it is to accurately drive these tiny steppers, I would not have designed it with everything riding on the single stepper of the X axis. Note to self: Do more research before jumping in!
2. Mechanical: I was never able to make the system rigid enough and that just further exacerbated the issues with accuracy – having you laser swing back and forth from vibration does not help accuracy! A more careful look at the design of the DVD linear stages would have revealed that the 3mm rods on which the sleds move are spring-loaded, and aren’t very rigid in the first place, and I would never be able to eliminate the swings. Note to self: Carefully examine the parts you’re planning to use! There may be surprises hidden in there
3. Logistics: This may not apply to everyone, but I went completely overboard getting the parts for this project. I have started getting the parts in bulk (most notably- old DVDs that became the base for the project) before tearing down a single one of them. It turned out that they are all so similar that it makes no sense to have dozens of them, even if they are cheap in bulk. 4-5 DVDs would work just fine for this project, and I bought 60+(!). Most of them are now cluttering by basement. Note to self: Don’t buy 10 times more parts than you actually need. Buy only twice as many as you need 😉
Interestingly, the project was not a complete failure. Quite a few things were done in the course of this project that I will use in the future.
- I’ve designed, debugged, ordered PCBs and populated a few boards of the TTL-controlled laser diode driver which I will continue using in my future laser cutting projects.
- I’ve created a very simple CNC controller schematics and Arduino sketch for it (more in this forum thread), which I plan on using with these small bipolar steppers in my future CNC projects
- The logic of driving two stepper motors in tandem and the methods for decreasing the effects of misalignment of the two linear stages actually worked, and I may revisit it in the future projects
- I built two versions of the CNC controllers that allowed me to play with both Linux CNC, which I was familiar with, as well as Replicat.org, which was new to me, which use two different approaches to G-code parsing. I will stay with LinuxCNC for now but the chance to get to know Replicat.org software was very helpful, especially with an eye on the future 3D printing projects
- I had a chance to take the closest look at the accuracy of stepper motor control I’ve ever done yet, and I’m pretty sure I’ll keep that experience in mind even when working with more accurate 200 or 400 SPR motors. The exaggerated inaccuracy of the little 16SPR and 20SPR steppers was quite illuminating in this respect
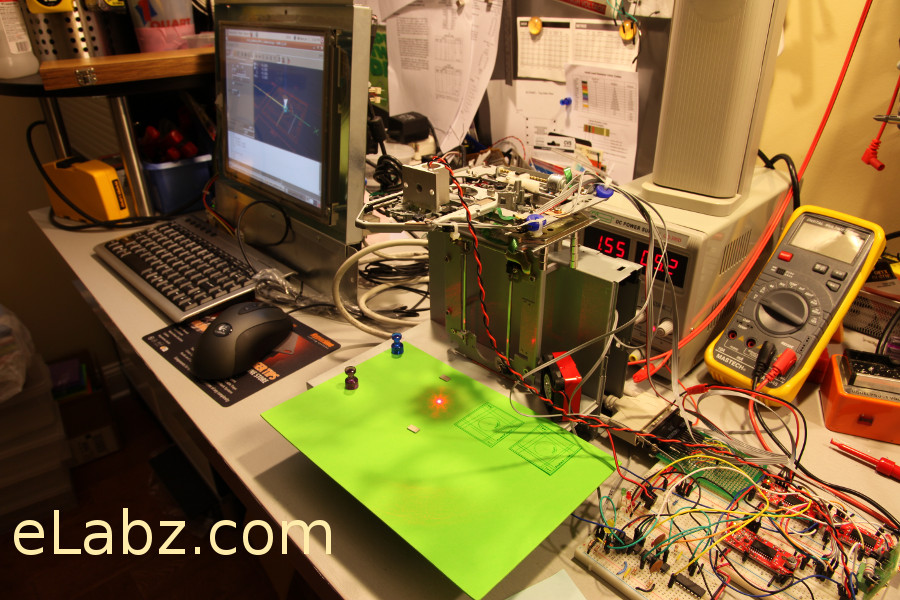
DVD CNC Laser Cutter – picture of the complete setup
In conclusion, despite the failure to achieve the needed accuracy, no regrets about starting this project whatsoever. It was great fun, but I do really need space on my workbench! So, the little machine has got to go but the lessons learned will remain in this blog for my future reference. Hopefully someone else can learn how not to build a laser cutter from DVD parts from this blog post as well.
[…] we see around here — it actually makes cuts! But [eLabz] looks on it as a failure because the steps of the driver motors are visible as jagged edges in those cuts. We see this more as a pausing point in the development process before the next refinement is […]
Hey eLabz!
Just saw your article on hackaday. Could you upload the test pattern maybe? Looks nice and could become the standard test pattern for us diy laser guys.
Hi Ian, thanks for stopping by! That sounds like a great idea, I’ll have to dust off some of the project files to find the pattern. I should have it in both SVG and Gcode versions, will upload as soon as I find them. Cheers!
Ian, I have uploaded the Gcode for the test pattern here http://elabz.com/?attachment_id=1698 For some reason I cannot locate the SVG source but I’ll keep looking. My CNC setup is in disarray now, I cannot test how the system of coordinates is defined – it could be in the center of the square, it could be in the left bottom corner, so be careful starting your cut. The whole thing is only 38x38mm though, so if you position it in a middle of the workspace of your larger cutter, you should be fine, but I thought it’s worth mentioning here in case someone cuts it on the actual DVD-based cutter.
Cheers!
Thats a great write up.. I was also just beginning to build one for my college project. Its just great you have written about details that i should not miss..
Are you using the stock Laser Diode of the DVD with Aixiz housing?
Rohit, yes, for this particular project I was using a laser diode from a DVD-RW drive with a standard Aixiz housing. I believe it was from a laptop drive, which was a rare find since laptop drives usually don’t have diodes in the form factor that works with Aixiz – 5.6mm can. Aixiz is not actually my favorite housing (more on that in the comments to this old post: http://elabz.com/laser-cutting-diy/ ) but it was just small and light enough for this project.
Hi, I also ran into the “have too many old drives” problem.
I did notice that the really ancient ones often have more powerful steppers though.
-A
LOL, Andre, my “too many old drives” problem is self-inflicted 🙂 I did not have this many (60+) before I got interested in this project, but then I got carried away just a little…
Anyhow, I wanted to say that the most ancient CD drives you can get your hands on have DC motors, not steppers. Some older mechanisms are so primitive that one cannot help wondering how this all worked back then – absolutely no feedback, all rack-n-pinion, no lead screws etc. I did, however, find a very promising old (you can already call it ancient – it’s circa 1998) DC-motor based CD-R mechanism with optical encoder feedback and just generally awesome build quality – NEC CDR-1900A (manuf. date 05/1998) which I am anxious to try as a base for my next DVD CNC project. Well, OK, if it works, it would become CD CNC – even better! 😉
Thanks for stopping by!
Hi,
Great article. I wish I had found this a long time ago. I’ve collected all the parts that I think I need to make a CNC laser cutter. After reading this I think I will have to blow the dust off the box and have a go.
Keep up the good work!
Gaz