Laser Diode Housing from Hardware Store Parts

Laser Diode Housing, MacGyver'ed. The focus is not THAT horrible, the camera picked up too much splatter.
")
Laser diode on a chip with PD arrays (front)
")
Laser diode on a chip with PD arrays (back)
It’s a weird looking laser diode (LD) that is mounted in the same case with the photodiode arrays which makes for simplified optics but I did not have any housing for this shape/size diode. By the way, if anyone reading this knows a professionally made housing for this type of LD, please post a comment with the reference, I would greatly appreciate that. The diode is just slightly smaller than your more standard 9mm LD – it’s smaller diameter is 6.50mm and the larger diameter is 8.25mm so it fits neither 5.6mm nor 9mm standard size housings.
This made me think that I may not be the only one stuck without a proper housing for a laser diode and I decided to see what it would take to build a housing for a laser diode out of parts available only in the disassembled drive itself and in a local hardware store. Here is what came out
Please note that this housing is not for collimating the beam (i.e. not for laser pointer – type beam), this housing is for focusing the beam on the material you’re cutting/engraving. Additionally, these lens are more of a concept than a finished product – you may be able to do much better than I did if you, for example, use washers with a larger internal diameter (or drill it to a larger diameter) to allow more light through and therefore stronger beam at cutting point. So use this as a source of ideas for your own laser lens build. And be careful: USE PROPER LASER SAFETY GLASSES !!!

Hardware Store Parts needed for the lens

Use gel type of superglue - easier to work with
You will need these parts from a hardware store (mine came from Lowes):
- #6 washer (3.95mm internal diameter, 9.70mm external diameter if you don’t use US standard sizes) from the fasteners section
- Two Compression Nuts with inserts for 1/4 OD tubing from the plumbing section. Confusingly, its internal thread is called 1/8″ FIP ( Female Iron Pipe )
- One 1/8″ MIP ( Male Iron Pipe ) – threaded Brass Pipe Nipple
As far as tools/ consumables, you’ll need superglue (I prefer the gel version of it), pictured. Also 7/32 nut driver bit, tweezers, pliers, a soldering iron and a bit of heat shrinking tubing to make it all look prettier in the end.

This is the lens we are looking for
We need to start by harvesting proper lens from the DVD drive itself. Due to the tiny size of its optical tract most of the lens are actually Fresnel lens (they look almost flat) and have VERY short focal distance, impractical for our project. However, all drives have one plano-convex lens with focal distance of approx. 40mm which is a good size for this project. These lens are located between the beam splitter/combiner cube (it’s not exactly in the shape of a cube in all drives, so look carefully) and the mirror that sends it towards the CD disk. This lens is usually relatively easy to get to and often only holds in place by a plastic wedge insert. But you may also encounter some glue as well, so be careful and look around before yanking it. Try not to mar the surface of the lens – it needs to be very clean to produce a strong enough beam.

Laser housing lens glued to the #6 washers
We need two of these but, since the CNC laser cutter project requires you to disassemble at least two DVD drives, you should have enough of these lens. Just be careful not to break any (or get a spare broken DVD drive for just in case)
Once you got the lens, use a toothpick to distribute small drops (just smudges, actually) of the gel type superglue around the inner hole of the #6 washer, then, using tweezers, strong>carefully drop the lens curved side on the washer, trying to make it well-centered relative to the washer. Flat side on washer works, too but if you drop the curved side down the lens appears to sit better – maybe it displaces extra glue to the sides easier than if it was the flat side down. Center the lens against the washer before dropping it on the washer. Because of the glue you won’t get much chance in centering the lens once it touches the washer.

press-fit_the_diode
While the glue is drying on the lens, use vise and the 7/32 nut driver but to press the diode into the compression nut’s larger diameter insert. Note that the smaller diameter insert may very well work for a standard 5.6mm diode if you cut the insert carefully to shorter length. I did not have a standard 5.6mm diode to play with but the size of the insert seems just right for press-fit a standard diode in it. Experiment!
After that use the vise again to pres-fit the insert back into the nut itself. The position that works just happens to be the reverse of how the insert would be positioned in the nut if you were attaching a 1/4″ tube to it but it holds inside the nut quite well anyway.
At this point you can put some heat shrink tube on the back of the diode to protect it during the following operations but I guess you can say this step is optional.

Drop the first washer with the lens glued so that curved side of the lens faces up

second_lens_goes_in
Put the second washer with the lens (again, curved side up) ontop of the nipple and carefully screw the second nut onto it. The washer diameter is just right to get itself centered relatively well inside the nut. So, if the lens was glued on well-centered, it should still be well-centered after all the threads are screwed all the way in.

Finished laser diode housing made of hardware store parts
And here is the finished housing with the diode ready to be plugged into your favorite laser diode driver and start burning something. I should once again point out that this housing was intended for fixed and relatively short (40 mm) focus situations – works well for cutting, does not work at all for laser pointers. Since the pipe thread is tapered, it only works when you tighten it all the way in (does not hold well until tightened) and so it would be hard to use this particular set of hardware to change focus. If you have to use this kind of housing, you’ll have to adjust the distance between the bottom of the housing and the top of the material you are cutting / engraving to 40 mm.

Laser diode, housed, in action
I also should point out that there are lots of disadvantages to using such a crude housing. I would say that in reality you might use it to start your laser cutter project going, work on the mechanical and CNC parts, and do some test cuts/engravings. All the while waiting for the professional housing you’ve ordered to come in the mail (’cause if it comes from China, it will take a while). You will save a lot of frustration by using a good housing because it will be able to convert more of the laser diode’s power into cutting at higher speeds, wider range of colors and thicker materials. But, once again, the crude housing described here should at least get you started.
Thanks for this very clear suggestion.
I have some questions for you:
1- It’s possible to find the same kind of lenses in a CD drive (RW)like in a DVD drive?
2-May be a good source of lasers and lenses may be the old PVR (like TIVO …)?
Luc
Hi Luc, thanks for stopping by!
I do believe CD-ROMs also have this particular lens although it’s been awhile since I’ve disassembled a non-writing drive. If they have it, it should still be between the splitter and the mirror. However, CD-ROMs optical part is much simpler, so it may even be positioned elsewhere. Look carefully and you’ll find this lens – it’s rather easy to spot because it’s different from all others in there.
Sorry I’m not familiar with TIVO PVR – does it write on a CD or DVD disk? If it burns DVD then yes, the laser can be there. If not, or if it only burns CDs, then the laser is either not in there or too weak to do anything useful with.
Hope this helps.
Cheers!
thank you very much for knowledge
CD laser diodes use the infra-red wavelength, therefore you cannot see it.
Be very careful when operating it!
Hi..
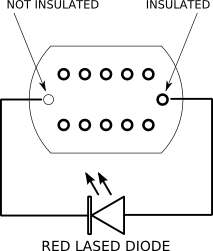
I have the same type 12pin laser diode from my broken CD drive, but I don’t know which pin should be used, would you like to share the pin function?
Thanks
Ira
Hi Ira, thanks for stopping by! I don’t actually have the complete pinout of this part because I was only interested in the laser diode. But if you are , like me, only using it for the red laser diode , then the diode is connected to the pins that are furthest away from each other. These are the only pins not in a row with others. When you remove the ribbon cable the laser diode is soldered to, you’ll see that one of those pins is isolated from the metal of the can. That’s the anode (+) and the one that’s connected to the can is cathode (-). I’m going to try to attach a pinout picture to this reply, too.
i opened HP dvd rom driver and i found two laser diodes, same diodes that at the top of the page. but i have noo idea how they work, so i need some help. reply here miksu_miikka@hotmail.com
Hi Mikka, thank you for stopping by my site!
There was actually an image with the pinout attached to this post but somehow it’s been lost after I have converted to a different comment system.
Here I will try to add it again (see below).
Basically this part is much more than just a laser diode but if you’re only interested in the light output, all you need to know is the two contacts for the anode and the cathode.
In addition to knowing the pinout you will need a laser diode driver – a constant current driver circuit, such as this one: http://elabz.com/ttl-controlled-laser-diode-driver/ . It’s a red (~650nm) laser diode and it needs approx. 40mA to start lasing and it will probably burn out once it reaches 160-200mA.
Let me know if I can be of more help!
awesome, im glad you posted the pinout for this diode…i was all excited when i ripped apart an HP drive to find the square diode…boo….still gonna see what i can do with it though. good post,thanks!
Thanks, Randy.
Just be sure not to look directly into an unknown laser diode while trying to figure out its polarity. There are both red and infrared laser diodes in a DVD burner and the photodiode array can be coupled to either (or can be a separate part, obviously). The IR is much weaker but still strong enough to burn your eye if you’re looking directly into it (there’s a lens glued to it, too). Also, I prefer to figure out polarity of an unknown LD while it’s still on the sled, the flex cable still attached. Normally you have two thicker conductors coming to it and a bunch of smaller ones if it’s in an array. Chances are – the two thick ones are the ones you’re actually looking for. If one of them goes to a conductor that’s not isolated from the metal body of the LD – that’s your negative. The other one is the positive then.
Good luck!
With all due respect I think you are going about this in a difficult way, you can go to laserpointerforums and find a great deal of info on the types of diodes you are looking for, along with some very good and very inexpensive drivers, along with very good pricing on diodes there.
Again, I don’t mean to be rude at all, but you may find a great deal of valuable information there with the projects you are working on and you can find sources for inexpensive diodes and parts.
I’ve found some of your information very interesting and I hope this may help you in some way.
Also, LPF member DTR has the best prices you will find on many of the parts that you need.
Thanks for stopping by, Tom. I’m actually an LPF member since I think 2009 or 2010 and yes, I’ve found a lot of interesting info there. But I do enjoy finding things out on my own, too, so this blog is basically notes about the long and winding path I take to do what other people have already bravely done before 🙂 Seriously though, I bet you nobody, including DTR, has a proper housing for this particular diode assembly ’cause it’s neither 9mm nor 5.6mm so, as much as I would want to get a ready made one, I could not.
Or, and another thing: since this was posted, I burnt this diode while ironing out some kinks in my TTL controlled laser diode driver design … It would be a shame to throw away a custom-made professional housing. This one I can just break down to parts again and use for any plumbing it was originaloly designed for.
Cheers and thanks for stopping by!
Thanks for the info, you are probably correct about the housing – but they definitely have tested this design on LPF and are familiar with it. The general consensus of course, is “oh no, it is one of those!” They/we don’t have a lot of use for them as pointers.
I appreciate that you did not take my comment as an attack, as I truly did not mean for it to be… I completely understand your wanting to take the “road less travelled” and I was just letting you know of the resource if you were not aware of it. Hope to see you on LPF sometime.
tsteele93
How was this laser as far as power?
I was happily using it at 130mA for some time, then decided to crank it up a bit and it died around 160mA. However, I could not be certain it was not the poor driver design that killed it. I have since re-designed the driver and I have a small pile of those laptop drives it came from left, so I can try again. Judging by the fact that it came from a 8x speed DVD burner, it’s probably a 140mA diode, see here: http://elabz.com/laser-diode-power-output-based-on-dvd-rrw-specs/ This is a rough estimate table, I still think that it I was careful I could have used it at 200mW for a few hours. Anyhow, it’s an odd shape of the can. If you have a micro lathe, you can perhaps bore the proper size seating for it in a 5.6mm AixiZ housing. As you can see on the photos here, using plumbing isle hardware store components is not ideal for micron-sized focusing. I was able to burn some foam with it but it was not precise in any sense of the word. My verdict would be: could be used for light-duty cutting but needs a better housing/optics for that. Cheers!
Do you think this kind of laser and optics is enough to vaporize black ink in a painted PCB?
What kind of power source are you using?
I’ve used this TTL-controlled laser diode driver
can i use dvd rw diodes with 3 pins
Of course, you will just have to figure out a way to bring the internal diameter of the housing down to about 4mm – the diameter of the diode’s can (not the collar which is the standard 5.6mm) so that the laser diode sits snugly in the housing. BTW, that large 12-pin laser diode also came from a DVD-RW drive, you just never know what you will encounter when you open one. Thanks for stopping by my blog!
can u say me where can i find thoe materieal because im from bosnia and cant find thoe materials
did you take out that bulky rectangular lens?
thank you sir for your effort,
when I came across this project,
I’m been motivated to give it try
now pls my question is what about
the power source?? (laser diode driver)
What are that 1/8 golden color parts? Do you have english names for it so I can google something similar in my city hardware stores?
Never mind, I found it!
Just for clarification, the mount is diode -> compression nut -> washer with lens -> mip -> washer with lens -> compression nut?
But,
I want to know (+)and(-) pinout